Most people start a pet portrait the same way: the animal won’t sit still, the photo looks flat, and the drawing ends up more like a generic “dog” or “cat” than your companion. The difference usually isn’t talent. It’s choosing the right reference, then building the drawing in calm, simple layers.
Below are practical ways to get a reliable reference photo, map out proportions, and suggest fur, feathers, and colour without overworking the surface. The aim is a portrait that feels recognisable at a glance, and holds up when you look closer.
Start with observation, not assumptions
Before you touch a pencil, watch how your pet holds themselves when they’re relaxed. Ears forward or to the side. Weight sitting back on the hips, or leaning into the front legs. A slightly tilted head that makes the eyes look different shapes. These small, repeatable details are what readers recognise as “them”.
Try a quick, low-pressure warm-up:
- Do 3–5 sketches that last one minute each. Keep them loose and simple.
- Focus on the big shapes: head mass, ribcage, pelvis, and the line of the spine.
- Save the eyelashes, whiskers, and individual hairs for later.
Choose (or take) a reference photo that actually helps
A strong reference photo is quiet and clear: good light, a clean background, and a pose that shows the head and body without distortion. Natural light (near a window, or outside in shade) usually gives you the best detail without harsh shadows.1
When you’re taking your own reference photos, look for:
- Eyes in focus (even if the paws blur slightly).
- Camera at pet-eye height to reduce “big nose, tiny head” distortion.
- A plain background so you can read the silhouette clearly.1
- Several options: one full-body shot for proportions and one close-up for facial detail.
If you’re using an online photo, make sure it’s licensed for reuse. Otherwise, use your own images.
Block in proportions before fur, feathers, or markings
Proportion errors are the reason many pet drawings feel “nearly right” but not quite. Slow down early. Measure relationships: how wide the muzzle is compared with the skull, how far the eyes sit from the nose leather, and where the ears attach.
A simple approach that works for most pets:
- Start with large shapes: an oval/sphere for the skull, a wedge for the muzzle, and a simple neck cylinder.
- Add a centre line down the face and a light eye line to keep features aligned when the head turns.
- Check negative shapes (the gaps between legs, the curve under the chin, the outline between ear and head). They’re often easier to judge than the animal itself.
Fur: suggest it with value and direction, not individual hairs
Fur reads as fur when the light and shadow are believable and the strokes follow the coat’s direction. Individual hairs only matter at the edges, and even then, less than you think.
Build fur in layers:
- Lay in the big shadow shapes lightly first (under the jaw, inside the ears, beneath the chest, behind the legs).
- Use stroke direction to describe coat flow (forehead down to muzzle, cheek fur sweeping back, chest fur dropping and fanning).
- Keep the darkest darks reserved for a few places: nostrils, the line between lips, deep ear shadows, and the pupil/iris edge.
Graphite and many professional coloured pencils are considered highly resistant to fading when displayed properly, but lightfastness varies by brand and colour. If the portrait will hang on a wall, look for lightfast ratings and archival papers.2, 3, 4
Feathers: think in groups, then refine
Birds look convincing when feathers are organised. Start with the body mass, then place the main feather groups: wing, tail, and chest. After that, suggest overlapping layers with clean, tapered strokes.
To avoid a “scaly” look:
- Indicate only a few feather edges sharply; let the rest soften into tone.
- Use value changes to show layering, not repeated outlines.
- Keep the beak and eye area crisp. That’s where attention naturally sits.
Materials that behave well (and last)
You don’t need a studio full of supplies. You do need materials that respond predictably and won’t fall apart when you erase, blend, or add layers.
Paper
- For graphite and coloured pencil: a heavier, acid-free paper with a little tooth (texture) holds layers without looking fuzzy.2
- For watercolour: watercolour paper (not sketch paper) prevents buckling and helps colours sit cleanly.
Pencils and paint
- Graphite: a small range (HB, 2B, 4B) covers most pet portraits.
- Coloured pencil: check the brand’s lightfastness information, especially for bright pinks, reds, and violets, which can vary widely.2, 3
- Watercolour: build from light washes to darker accents; keep white fur areas mostly paper, not white paint.
Safety and “non-toxic” labels
If children will use the materials (or if there’s a habit of pencils in mouths and paint on hands), look for recognised safety certification. The ACMI AP seal is used internationally to indicate art materials certified as non-toxic when used as intended, and the CL seal flags products requiring cautionary labelling.5, 6
How to draw different pets (what to prioritise)
Dogs
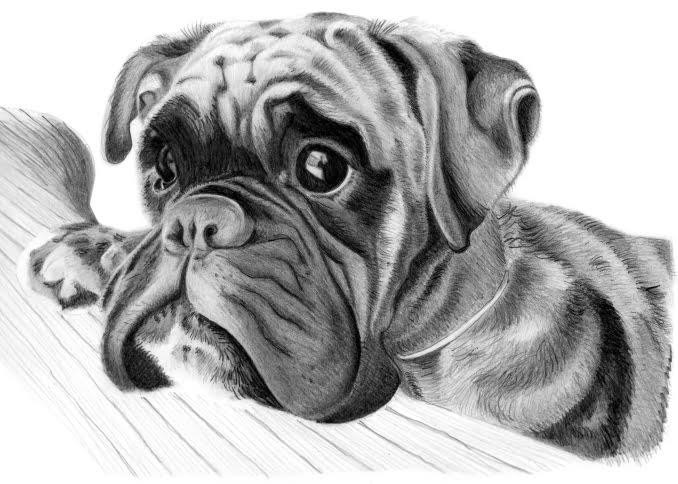
Breed shapes matter, but skull structure matters more. Place the eye sockets and muzzle plane first, then adjust the silhouette (stop, jowls, ear set). Use value to show form: the turn of the forehead, the barrel of the muzzle, the shadow under the brow ridge.
Cats
Cat faces often look “off” when the eye placement is wrong. Keep the eyes large but not circular, and watch the angle of the inner corners. Fur changes direction sharply around the cheeks and neck; that’s where stroke direction does a lot of work.
Birds
Get the beak shape right early. Small changes in curve and proportion change the species. Feathers come later, as grouped textures over a clear body form.
Small mammals and reptiles
For rabbits, guinea pigs, and rats, keep edges soft and values gentle—these animals often have subtle form transitions. For reptiles, rely more on clean planes, crisp edges, and controlled highlights than blending.
Common mistakes that flatten a pet portrait
- Working from a distorted photo (close-up phone shots can enlarge the nose and shrink the head).
- Drawing fur first instead of building the underlying form in light and shadow.
- Outlining everything (it removes the softness that makes animals feel real).
- Even detail everywhere (keep the sharpest edges and strongest contrast around the eyes and muzzle, then let other areas quieten).
- Over-whitening highlights with heavy pencil pressure; preserve highlights by leaving paper showing where possible.
Adding colour without losing realism
Colour works best when it rides on top of good values. Even a bright ginger cat is mostly a careful range of warm greys and browns, with richer colour saved for a few notes.
- Watercolour: begin with a pale “overall” wash, then glaze (layer) darker values. Let the paper create sparkle in whisker pads and catchlights.
- Coloured pencil: layer lightly. Use several close colours rather than one heavy pencil. Burnishing (pressing hard to blend) is best saved for late stages.
- Markers: test first; they can stain quickly and are harder to correct.
Final thoughts
A good pet portrait is usually a quiet accumulation of small choices: a reference photo with honest light, proportions checked early, shadows that describe the skull and body, and texture added only where it helps. When it starts to feel messy, step back and look for the simplest truth—one clear shadow shape, one clean edge, one calm highlight—then keep going.
References
- ABC News (Australia) – Tips for taking great photos of your pet
- Faber-Castell – Lightfast ratings (Blue Wool Scale and star system)
- Coloured Pencil Society of America – ASTM D6901 standard for artists’ coloured pencils
- Lightfastness (overview and common rating scales)
- ACMI – AP and CL seals (what they mean)
- ACMI – About ACMI and the certification program

Veterinary Advisor, Veterinarian London Area, United Kingdom